Posts

Showing posts from May, 2024

Project Two Progress

Image
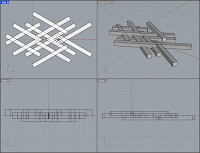
    I've settled on making my jewelry design a tiara, but I'm still figuring out the final design that will be. I've been experimenting with various tools to create geometric patterns for the tiara. I'm mainly inspired by the inclusions formed in the rainbow lattice sunstone in the concept post for this project, but I've also been exploring more curved geometry inspired in part by mathematical topology.     Something that needs to be considered for my concept to work, is that for the tiara to be printed as a negative cavity that can be filled with liquid, is that all piece of the tiara must be connect, with the smallest cross section to be no smaller than 2mm in order to ensure printing clearance for the gap, and that the surface tension of the liquid I use to fill the cavity doesn't keep air bubble from escaping.     I am also contemplating another method to reach similar outcome, where I instead 3D print only the outer shell of the tiara, o...

Project One Conclusion

Image
     The end of this project had a few obstacles and hiccups. For one, the sheets of plywood were actually only about 23 and a half inches long instead of 24 inches, forcing me to scale down my full drawings by a factor of about 1/50th last minute. Unfortunately, I didn't have the time to scale my drawings without scaling the dowel holes, and so they all ended up too small for my dowels to fit. To compensate, bored the dowel holes with drill bits of the right size.      I also really underestimated the how wide the cuts from the laser would be, so much pieces didn't line up as precisely as I had hoped.      Another factor I had considered was the amount of friction there would be between my moving part, which meant that I had to compromise on some of my moving parts in order for the iris mechanism to work. I tried to wipe the parts with candle wax to lubricate the parts, but it wasn't enough. If I had known that the friction would be such a p...

Project Two Concept

Image
For this project, I want to model jewelry inspired by gemstone inclusions, where I created a negative of the jewelry, so that it looks as though it is trapped within the solid material,  I'm going into this project with the intent of using the models for the third project, so that I can spend more time on experimenting with the material.       Some basic sketches of a ring and a geometric shape as cavities within the clear PLA, as well as a sketch of several "trapped" pieces of jewerly strung together for a necklace.   A (very) rough sketch of a tiara cavity inside the solid clear plastic. As far as printing goes, I'm going to attempt to print the pieces with a hollow low density infill between the cavity and the outer walls, and then fill that with either a clear liquid such as water or oil, or fill it with epoxy resin. Here are a few images of gemstones with inclusions that I'll be taking inspiration from. Quartz with red rutile inclusions Quarts point with pe...

Project One 3D Modeling

Image
After a few more revisions, and reworking most of my joinery to be stronger, I was able to get my piece fully modelled in Rhino. I had to cut some the pieces up into smaller pieces in order for them to fit in the 12 x 24 inch sheets, so I modelled some basic key joints along the split edges of the parts in order to fit them back together after cutting. I intend to keep most of the cut outs from my tiled pattern to use for making jewelry. I also finally settled on a design to engrave on the front most face of the box. I created a sort of squiggly pattern to fill the face that's made from one single line. It was inspired by patterns that are created by various organisms, such as slime molds, as well as by the organic patterns formed by ferro fluids under a microscope. Looking forward to seeing how everything looks once everything has been stained and assembled.

Project One progress

Image
     I've had to revise my plans a bit, as my original idea proved to be too intricate and technical to achieve in such a short time frame. I've kept some of the original concepts, such as rotating faces with patterns cut out of them, but I've opted to make the piece more interactive by having the viewer pull a string in order for the piece to move. As for making the piece a vessel, I'm going for an iris mechanism that's opened through the activation of the piece, which then will allow the viewer to see into a compartment inside, intended for holding some sort of object. I'm not certain what I want the piece to hold, but I'm leaning towards a set of earring, or a pair of rings.      I tested out a few variations of pattern based on one of the fractal patterns, including a version that is one singular closed curve, but given that I want the pattern to be cut from a single sheet, a closed curve would leave a pattern with few points of contact with the frame, ...

Rhino 8 practice

Image
 Having had experience with other CAD programs and many years of using Blender, learning how to use Rhino has been relatively easy. The practice sheet provided was great for learning how to apply some of the basic tools and manipulations. Of the examples to replicate, I only found two of them a bit challenging. This first one was a bit tricky for me because of the way the object snapping works. I found the tool less intuitive than most of the other tools. This shape I ended up using a different method than what was listed under it, as I couldn't figure out how to get the inset circles to snap to the centres of the outlined circles, but I found my own way to the solution regardless. Overall, I'm enjoying using Rhino, and exploring what other tools and features it has.

A bit of an introduction

    Welcome. My name is Avery. I'm an interdisciplinary artist, majoring in jewelry, interested in exploring the materiality of art and using materials to influence and evoke thoughts about various topics and issues. As a queer non-binary person, my work often intersects with my identity, analyzing myself, my perspectives, how I'm perceived, or societal expectations of behaviour and aesthetics. I take inspiration from members of my community, nature, as well as mathematics and the sciences.     This blog will serve to chronicle my thought processes and documentation as I explore and learn object design and fabrication practices.        Project One      In this first project exploring laser cutting and patterns, I'm interesting in creating a clock like mechanism that doesn't allow the viewer to tell time, but instead creates a unique time based experience. As well as having moving parts, I intend the centre of the...